One of the major task of our research topic is to integrate our volume rendering technique with Maya. Different from our previous results, human thermal refraction requires a precise human figure model. Without using Maya, it will leave us tremendous work to get a pleasing image.
On the other hand, even though we have get some experience on Maya plugin development through CIS660, neither of us have tried writing a renderer. Significant amount of time will spend on figuring out how to render a custom geometry, the human figure and the environment which is affected by thermal refraction in our case.
By our research so far, there's a few ways of doing this.
For rendering just single scene entities, there's MPxLocator which is used widely. This creates a new locator type (a scene entity) that we can instantiate in the scene. The MPxLocator class has virtual overrides for draw/bbox/etc. But a more elegant way is to take over the viewport.
For taking over the viewport, it's a bit more complex...
1. MPx3dModelView. This class allows us to create our own viewport type. Once registered and scripted in properly (the examples are provided in the MPx3dModelView docs), we'll be able to select it in the viewport's 'Panels' menu.
This will provide us with an opportunity to perform multiple draw passes and add our own custom draws and such. We see people used it for implementing full screen post processing effects. It becomes more difficult if we want to fully override the draw, as this class doesn't provide us with direct override draw calls per object. It just gives us control over the passes.
2. MPxHwShaderNode/MPxHardwareShaderNode - This will give us a new shader node type using hardware shaders. When the shader is asked to draw, we'll receive our bind and draw calls for which we'll have access to the given shape's vtx/face data and can perform our custom draw there. This is what the cgfxShaderNode is based on.
3. MViewportRenderer - This will give us the full override of the viewport. The downside here is that there are no utility methods to help us render any of the built-in draw functions like the HUD, draw feedback (like artisan brushes), manips, etc. Although it won't be very usable to interact with, we think practically this is useful as a visual feedback viewport.
We decided to use MViewportRenderer as our approach. Maya has provided the OpenGLViewportRenderer plugin in its devkit. It does not come with complete docs. Our next step is to modify existing codes to render a simple voxel buffer.
Tuesday, June 7, 2011
Thursday, June 2, 2011
Previous Work - Physically Based Thermal Refraction due to Fire, Heat, and Smoke
Thermal refraction is a naturally occurring optical phenomenon in which light rays bend due to rapid differences in temperature and composition of participating media. The resulting images show characteristic "shimmering" and rapid local intensity fluctuations and heat advection.
This secondary effect provides important visual cues to enhance a scene's realism when lit by firelight. We proposea physically based technique for animating thermal refraction attributable to large changes in temperature due to fire, heat and smoke. A key contribution of our method is an automatic approach to correctly vary the reflective index around exothermic thermal phenomena and change the spectral properties due to absorption and scatter effects. We present a novel volumetric photon mapping method which treats both the flame and smoke as light sources: photons are emitted based on both smoke and fire energy levels.
Our method extends volumetric rendering by a physically derived model to ray march voxels to account for the optical properties of participating gas and flame. The time varying photon maps produce the fluctuating illumination on scene surfaces and caustics. Using this physically
based rendering technique, we generate realistic fluctuations in light distribution and refractive distortion effects due to fire, smoke, and hot particles. Lastly, we compare our work to previous
approaches to show how modeling the whole thermal event produces a more realistic simulation.
based rendering technique, we generate realistic fluctuations in light distribution and refractive distortion effects due to fire, smoke, and hot particles. Lastly, we compare our work to previous
approaches to show how modeling the whole thermal event produces a more realistic simulation.
 rendered image with diffuse wall
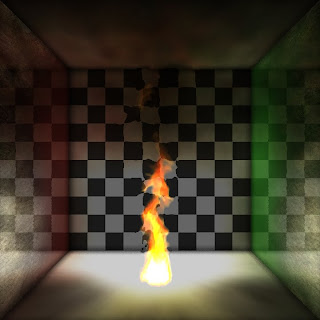
rendered image with specular wall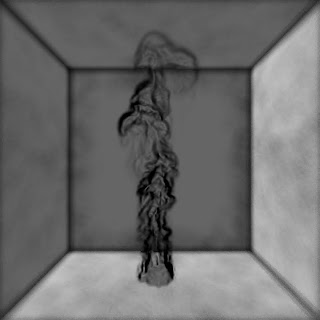
rendered image with only schlieren effect
Subscribe to:
Posts (Atom)